Processing membership payments, invoices, and receipts
Membership payments are automatically tracked and recorded in the Membership module. Invoices and receipts can also be easily generated for all membership items. However, before invoices can be generated, the option to generate membership invoices must be activated in the Finance Settings section located in the Organization Settings dropdown menu. Receipts will also be generated by default for all membership payments. They can be sent automatically after each purchase or manually, depending on the preferences you selected in the Finance Settings section. Membership invoices and payments can be found in the Finance section within the Membership module.

Invoices
Sorting invoices with the list selector
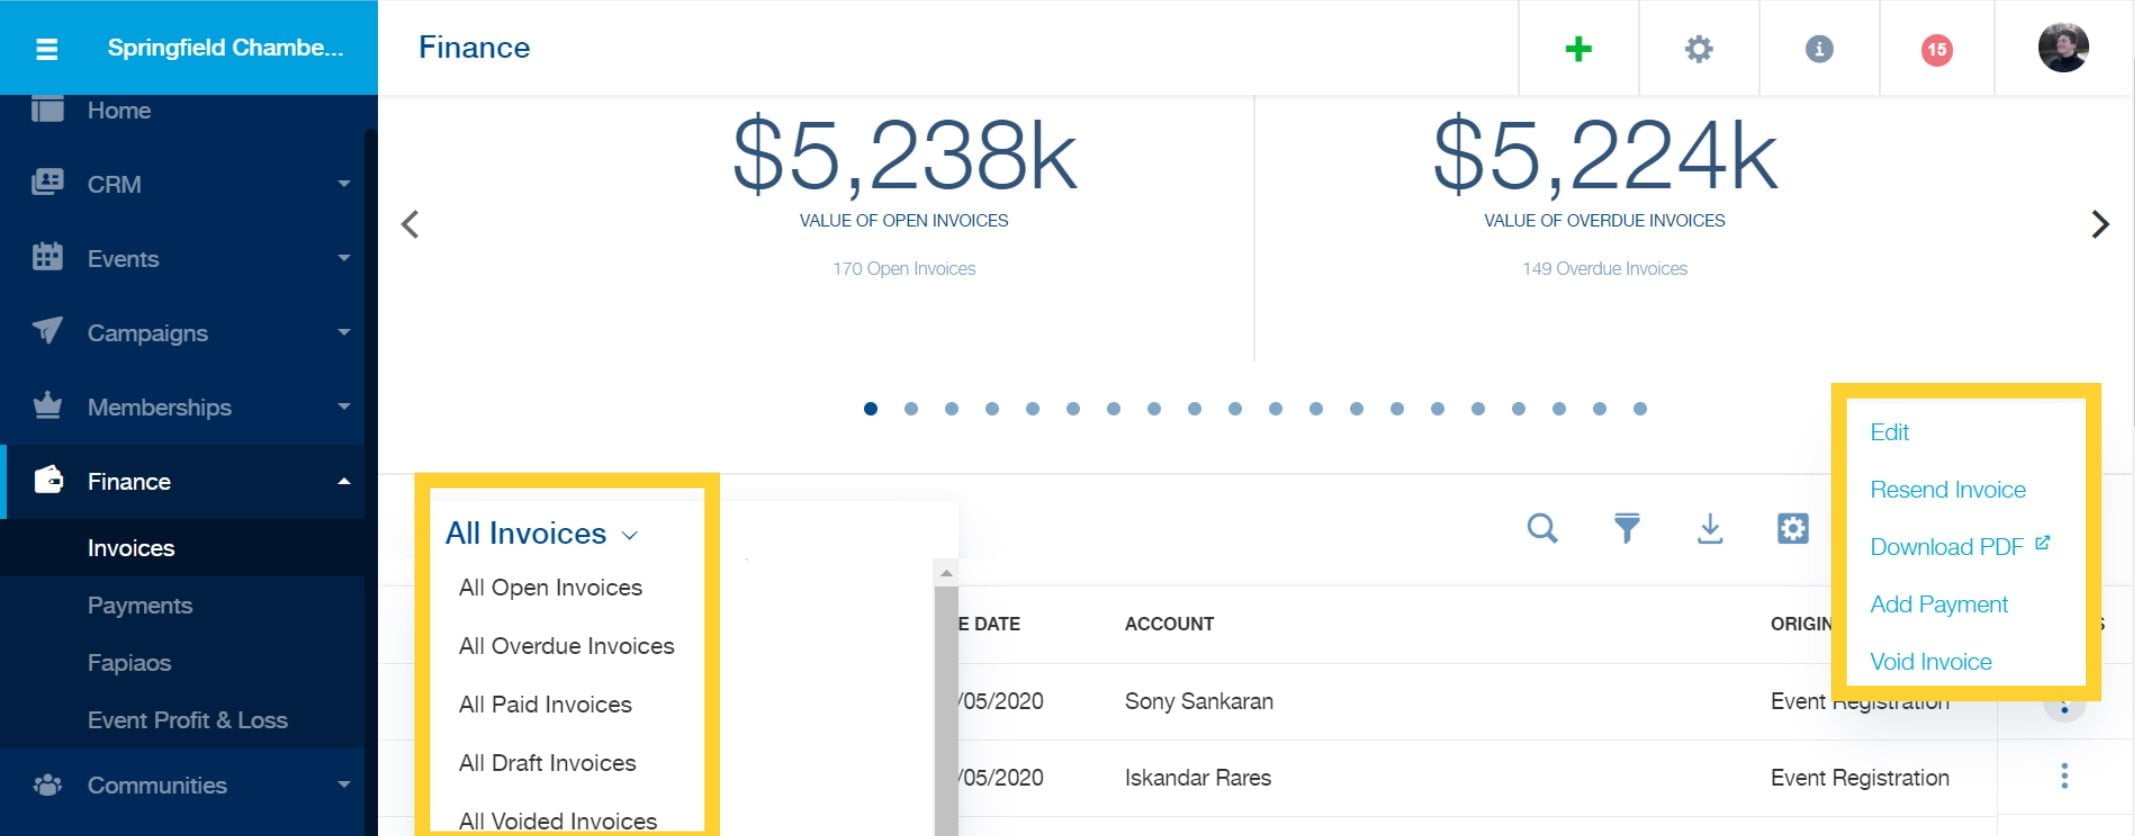
You can sort invoices in the main screen of the Invoices subsection by clicking the down arrow that is part of the list selector. The list selector defaults to All Invoices when you first arrive on the main screen. List selector options include:
- All Open Invoices: This displays all open invoices in the platform.
- All Overdue Invoices: This displays all open invoices that are past due.
- All Paid Invoices: This displays all invoices that have been paid.
- All Voided Invoices: This displays all invoices that have been voided.
- An invoice can only be voided if it has not been paid.
Managing invoices and payments with quick-access icons
You can also use any of the quick-access icons to manage invoices for your event. Quick-access icons include:
- Search: Click the magnifying glass icon to quickly search invoices.
- Filter: Click the filter icon to narrow your search results. For more information about filtering your search, click here.
- Export: Click the export icon to download all invoices included in your search or filtered list.
- Show/Hide Columns: Click the show/hide icon and select Manage displayed columns to customize your table display. The invoice table can be sorted by default fields. Default fields include: Invoice Number, Issue Date, Due Date, Account, Origin, Total, Balance Due, Status, Amount Paid, Membership ID, Void Date, Voided By, and Void Reason.
Tip: If you want to update any finance settings, click the show/hide icon and select Manage Finance Settings. This will redirect you to the Finance Settings section.
Fast actions for invoices
In the main screen of the Invoices subsection, you can click the three dots icon in the row of your desired invoice to perform fast actions related to that invoice:
- Edit: This will take you to the invoice’s edit page.
- Resend Invoice: This lets you resend an email notification to the related contact. The notification includes an attached PDF of the invoice.
- Download PDF: This lets you download the invoice to your device.
- Add Payment: This lets you select an online or offline payment for the invoice. Once submitted, the invoice will be marked as paid.
- Void Invoice: This will void an invoice that has not been paid.
Managing multiple invoices simultaneously
In the main screen of the Finance module’s Invoice section, tick one or more checkboxes – respectively located next to the invoice numbers – to select multiple invoices. Click the Download PDF at the top of the main screen to download all items in your selection to your device, or click the down arrow that is part of the Download PDF button to resend an invoice to the related contacts all at once.
Editing invoices
Invoice information can be edited by clicking a three dots icon in the row of your desired invoice and clicking Edit. You can edit invoice recipients, edit billing address information, adjust the issue and due dates, add and delete invoice items (when an invoice is unpaid), add attachments, and make changes to additional information displayed on the invoice. Be sure to click the Save button when you are finished.
Payments
Sorting payments with the list selector
You can sort payments in the Payments subsection by clicking the down arrow that is part of the list selector. The list selector defaults to All Payments when you first arrive on the main screen. List selector options include:
- All Payments – This displays all valid and voided payments.
- All Completed Payments – This displays all completed transactions.
- All Voided Payments – This displays all invalid transactions.
Fast actions for payments
In the main screen of the Payments subsection, you can click the three dots icon in the row of your desired payment to perform fast actions related to that payment:
- Edit: This will take you to the payment’s edit page.
- Resend Receipt: This lets you resend a receipt to the related contact. The notification includes an attached PDF of the receipt.
- Download PDF: This lets you download the receipt to your device.
- Void Payment: This will void a payment.
Important: If you wish to refund an online payment, you must contact finance@eventbank.com.
If you click in the middle of a row, a side panel will pop out with an overview of the payment information. This panel also provides action items such as edit, download PDF, resend receipt, and void payment. Additionally, you can click the origin link, it will redirects you to the respective event registration or membership profile page. The panel also provides an origin link, payment date, transaction amount, payment method, payee contact details and related invoice information.
Managing multiple payments simultaneously
In the main screen of the Finance module’s Payments section, tick one or more checkboxes – respectively located next to the payment ID numbers – to select multiple payments. Click the Download PDF at the top of the main screen to download all items in your selection to your device, or click the down arrow that is part of the Download PDF button to resend a receipt to the related contacts all at once.
Editing payments
Payment information can be edited by clicking a three dots icon in the row of your desired payments and clicking Edit. Because payments are transactions that are already complete, you can only edit the internal note, the message displayed on the receipt, and attachments. If you attach a file to the payment and tick the ‘Attach to email’ checkbox, the attachment will be delivered to the payee’s inbox when a receipt is delivered. Be sure to click the Save button when you are finished.