Publishing an event
Once you have created an event, you can adjust event settings, tickets, content, and website information by going inside the event you want to edit and entering any event-specific sections in the Event module’s left sidebar navigation menu.
Configuring event settings
In the General Settings subsection of Event Settings, you can edit or adjust any items configured during the initial event setup. You can also configure the event time zone, your organization’s role, event tags, host committees, and event contact information.

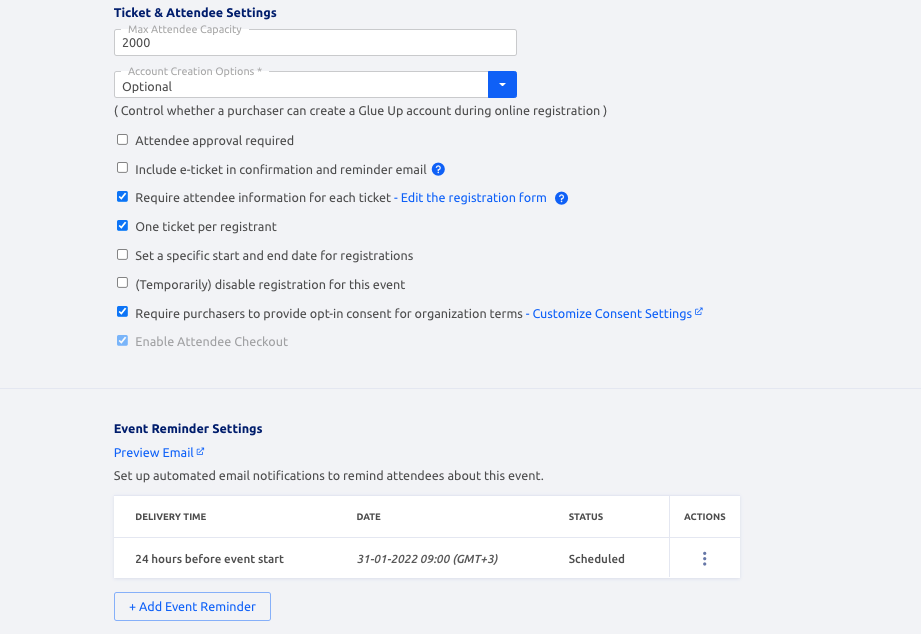
You can choose to limit the event’s attendee capacity, whether event registrants must create a Glue Up account, require approval before tickets are issued, include e-tickets in event confirmation emails, require attendee information for each ticket, require one ticket per registrant, set specific start and end times for event registrations, temporarily disable event registration, or require purchasers to provide opt-in consent for your organization’s terms. Additionally, you can show the event on your organization’s Glue Up public page. After it has been published and add social links to help promote the event.
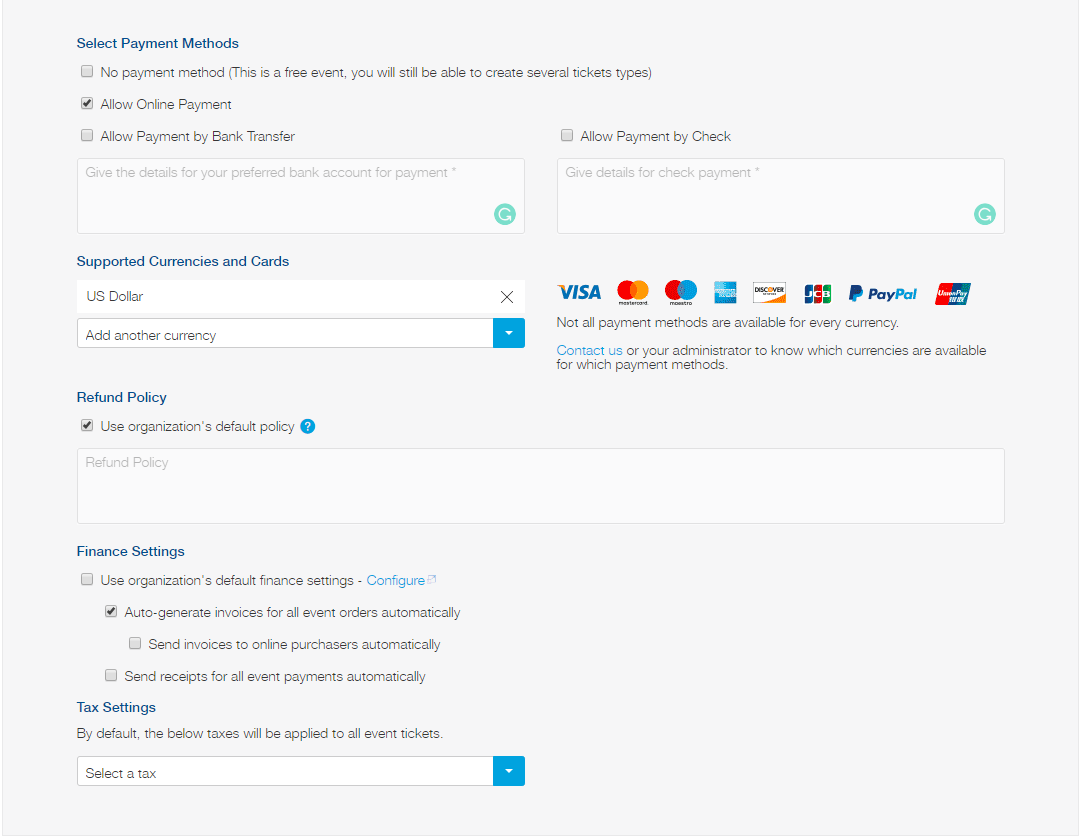
In the Payment Options subsection of Event Settings, you can choose available payment methods, supported currencies, refund options, and other tax and finance settings. If you want to configure tax settings, taxes must be configured in your organization’s Finance module settings.
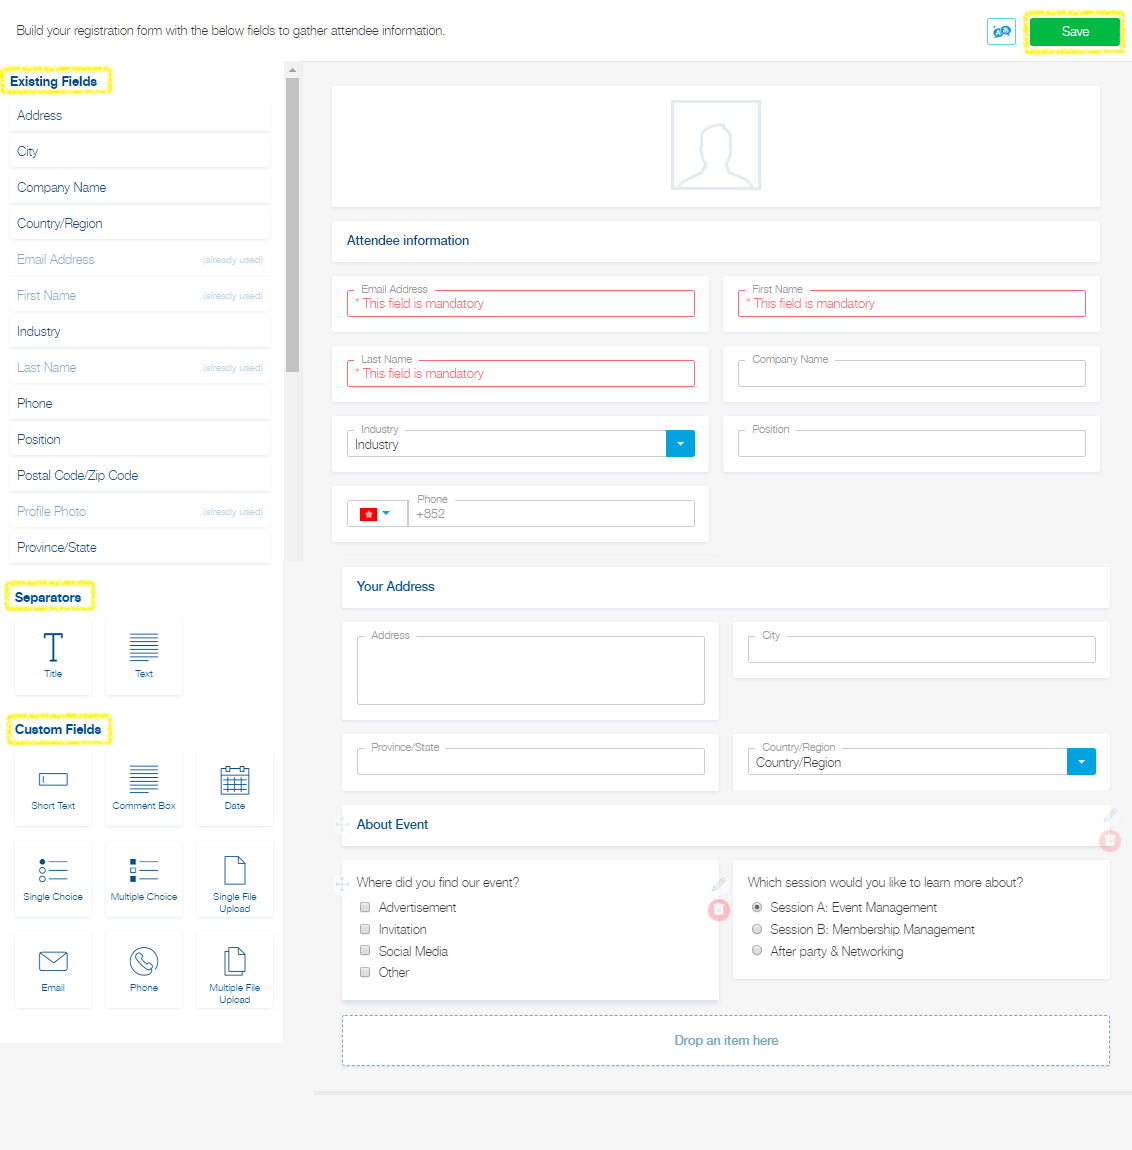
In the Registration Form subsection of Event Settings, you can customize the registration form for the event. Blocks can be moved, edited, and deleted as needed. You can select among existing CRM fields, separators, or new fields:
- Existing CRM Fields: Drag and drop any existing CRM fields to collect information from your attendees.
- Separators: Add separators such as title and paragraph blocks to ensure a clean design. Paragraph fields also support hyperlink functions.
- New Fields: Click the Add New Field button to add a new field. Single and multiple file upload options are available here.
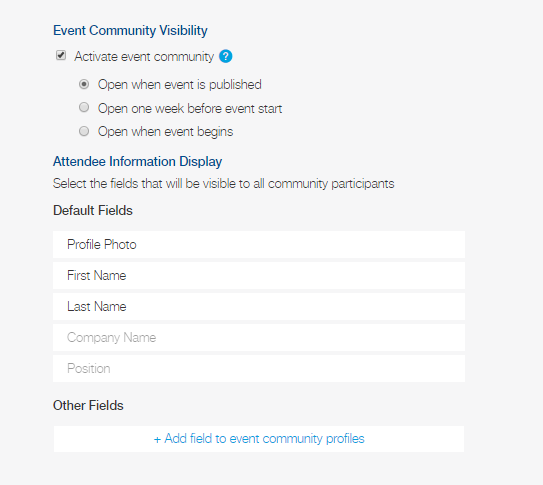
In the Community subsection of Event Settings, you can activate and configure event community settings. Activating the event community will allow attendees to see who else is attending the event and provide them with the ability to save one another’s contact information with the Glue Up app. Choose whether you want to activate the event community and determine when you want the event community to appear. The event community will be automatically activated by default. The attendee information default fields will automatically appear according to the existing CRM fields you added into the registration form.
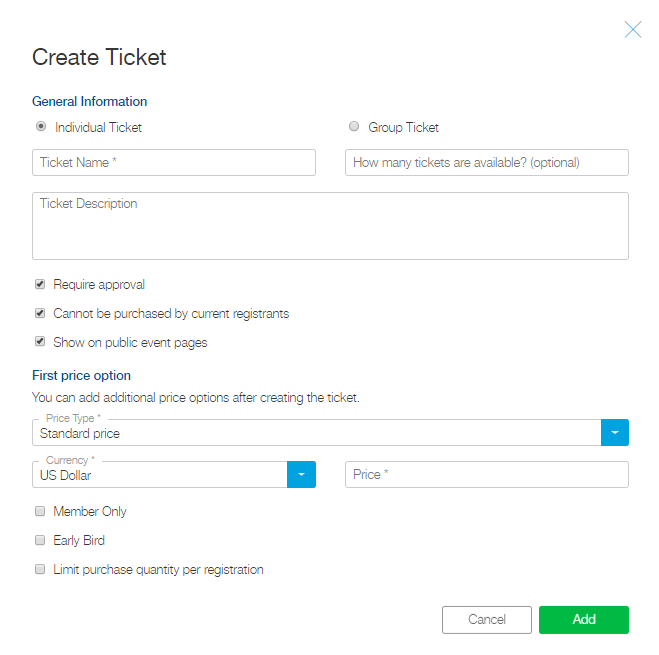
Creating tickets and discounts
In the Tickets & Discounts section, you can create event tickets. Click the green + Create Ticket button to add a ticket and enter the ticket name, description, and the number of tickets available. Continue by filling in the ticket description, and tick any checkboxes to add any restrictions as per your event settings, or display the ticket on your public event website. Select a price type, currency, and price for the ticket and place any further restrictions. Available restrictions include:
- Member Only (Chamber & Association clients only): This option will make the ticket only available to organization members. You can also specify which members can purchase this ticket by clicking the blue link to define specific membership types. When this checkbox is ticked, you can also choose to make the ticket available only to primary members. If a member belongs to corporate membership and is not the designated primary member, he or she will not be able to purchase this ticket. However, members with individual membership will still be able to purchase this ticket.
- Early Bird: This allows you to add an option for a cheaper ticket price that ends on a set date before the event.
- Purchase Quantity per Registration: This option will limit the minimum and the maximum number of tickets available per event registration.
Important: If the box for the number of tickets available is left empty, an unlimited amount of tickets will be available.
Adding content
The Content section is broken down into multiple subsections. In the Summary subsection, you can add an event description that will be shown on the homepage of the event website.
In the Speakers subsection, you can add event speakers. Click the +Add Speaker button to add a speaker. You can either search and select a contact from the CRM module, or add a speaker manually.
Tip: You can also register speakers for the event and disable registration notifications.
In the Agenda subsection, you can configure your event agenda. Click the +Add Agenda button to build your event schedule. A drag and drop tool will appear to help you create your schedule when you add a new session. Drag and drop items include sessions, breaks, gaps, and tracks.
Tip: Tracks allow you to host multiple sessions at the same time.
In the Venue subsection, you can add the venue information. Enter the venue name and select an option from the dropdown menu. Edit any venue information and adjust the map as needed — be sure to click the Confirm Pin button to save your pin and map. Click the Save button when finished.
In the Sponsors & Partners subsection, you can add sponsors and partners for your event. Click Create Category to add a sponsor and partner category and enter the name and description of your category, e.g. Gold Sponsor, Contributions of $10,000+. Then, add a company as a sponsor or partner by searching the CRM or inputting the information manually. You can choose to track the sponsorship value to include in your event’s P&L report or hide the sponsor from the event website.
In the Documents subsection, you can upload files for your event. Click the +Add Document button to upload a file. Documents can be edited and deleted as needed by clicking the appropriate three dots icon. Clicking the document name will allow you to preview the document itself.
Important: Each document can be no larger than 10MB. All documents uploaded here will be available for attendees to download from the event website or Glue Up mobile app.
Designing your event website
In the Layout & Design section, you can select a banner for your event website and make changes to your event website.
To upload a banner to your event website, select the Banner dropdown tab and click the Upload Banner link. Be sure to use an image that is no larger than 10 MB with a minimum width of 1920px and a minimum height of 500px for best results.
Note: GIF files can also be used as event page banners.
You can change your website’s template by selecting the Design dropdown tab and clicking the Change Template link. Choose from several pre-made templates or select from any of your organization’s customized templates if any are saved in the platform. Font and colors can also be selected in the Design dropdown tab and you can save your current template for future events. For more information about event templates, click here.
Your event website can also be adjusted by customizing each website section. Click the Customize Pages dropdown tab to view available sections for your template. You can choose to show or hide any section by hovering over a section title and clicking on the eye icon to the left of the section name. You can also adjust the section order by dragging and dropping the sections within the column. If you want to make any updates to a section, click the pencil icon to go to the edit screen. Additional sections can be added to your event website by clicking the + Create a new page link.
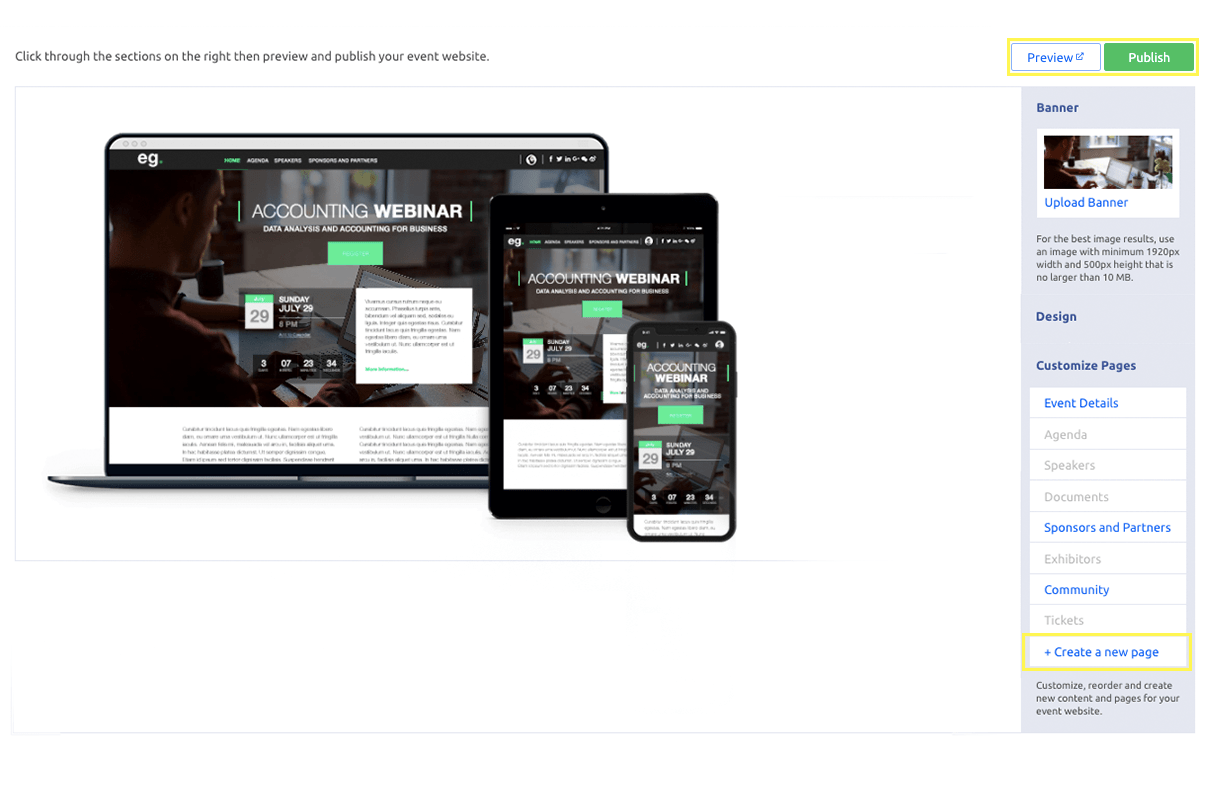
Previewing and publishing an event
In the Layout & Design section, you can preview your event website before officially publishing your event. Click the Preview button to view your settings.
When you want to make your event go live, click the Publish button. After you click the publish button, you will have one last chance to make edits to your start date, end date, venue, and speaker list before the event goes public. Notably, you can make changes to the event at a later time, but all information will go live when you click the Publish button. After the event is published, it can be found on the internet and across search engines.