Configuring membership types
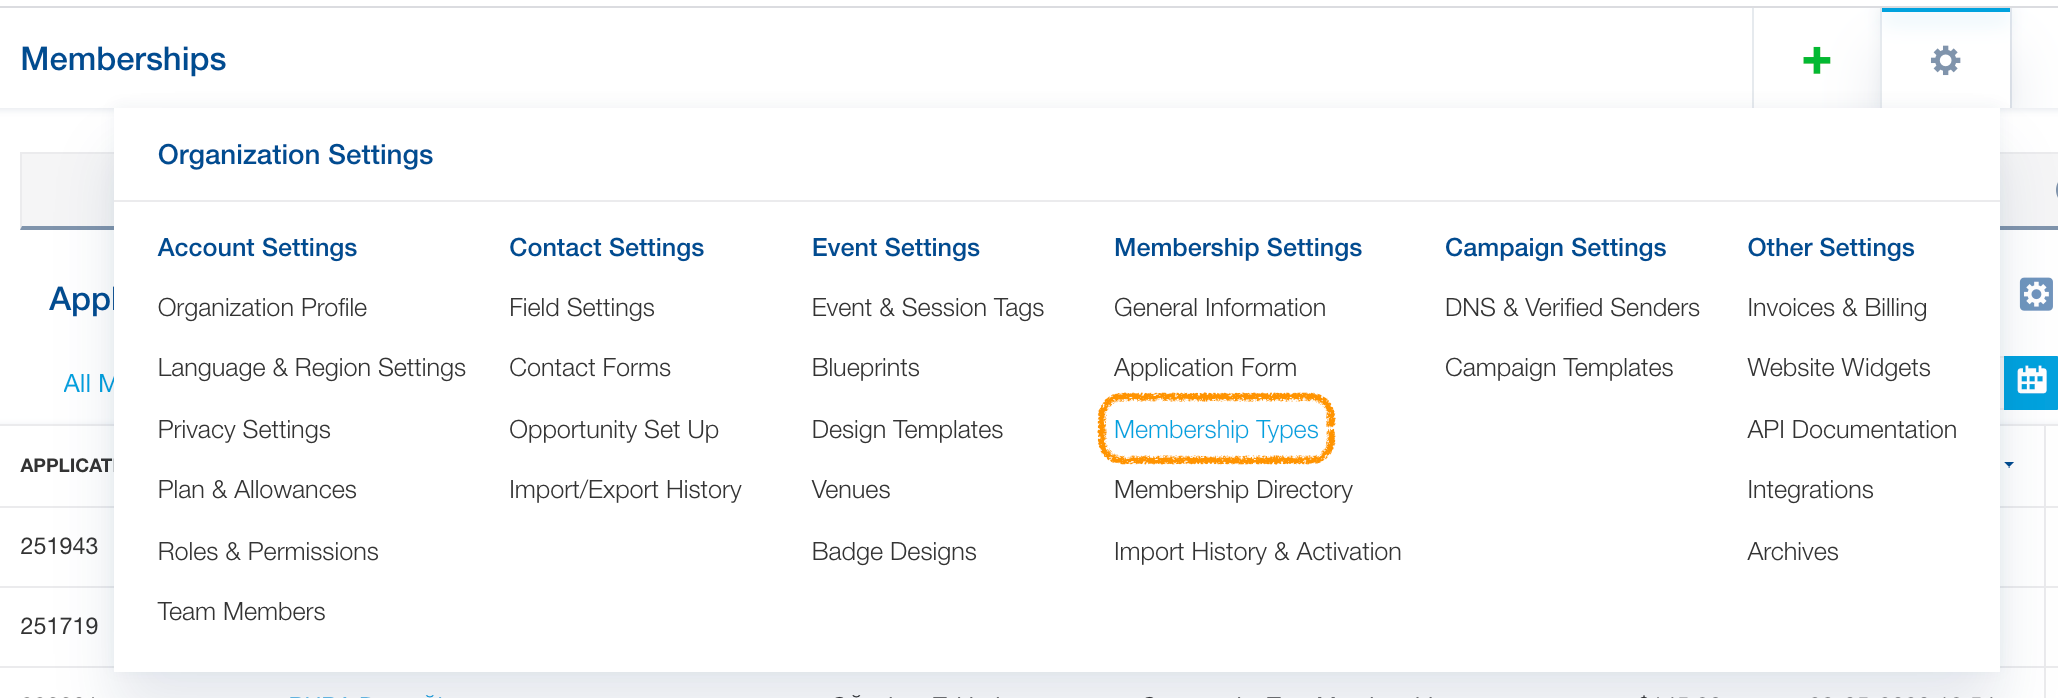
You can add, edit, or deactivate membership types in the Membership Types section of Membership Settings. To make changes to your organization’s membership types, click the double-gear icon located in the platform’s top navigation bar to open the Organization Settings dropdown. In the dropdown’s Membership Settings column, select Membership Types.
Next in the Membership Types section of Membership Settings, determine the membership types your organizations uses. After you’ve added a membership type, you will be able to edit or duplicate membership type information, import memberships, access any related membership application forms, or deactivate the membership type.
Important 1: Settings for each membership type must be configured separately. Every edit will have to be applied for each membership separately.
Important 2: A membership type corresponds to a unique price and duration. For instance, if you manage a membership type which has a price structure consisting of different pricing levels, you will have to create a membership type for each one of them.

Adding a membership type
Step 1: General Information
Add a membership type by clicking the green + Add Membership Type button. Enter the public and internal names for your new membership type, choose a category, determine any member limits, select a time duration for the length of an active membership, and choose whether to keep the membership type private or include it in your organization’s member directory by ticking the checkboxes. Any information you include in the membership type description will be visible in the membership application for the membership type.
Important: If you select the corporate membership category, you can enter a member limit for the number of members in each membership and choose whether additional membership slots can be purchased.
Tip 1: if you have a great amount of membership types with complex structures, you might want to use PRIVATE membership types. You could then link the application form of these private ones in the description of public membership types. This
Tip 2: You can fix membership end dates by ticking the checkbox ‘Membership ends on fixed date(s)’. If the duration of membership is 3 months, 6 months, or 1 year, you can set up the membership type to renew on the 1st or the 15th of a month, and select months for renewals. Learn more about setting up prorated membership types.

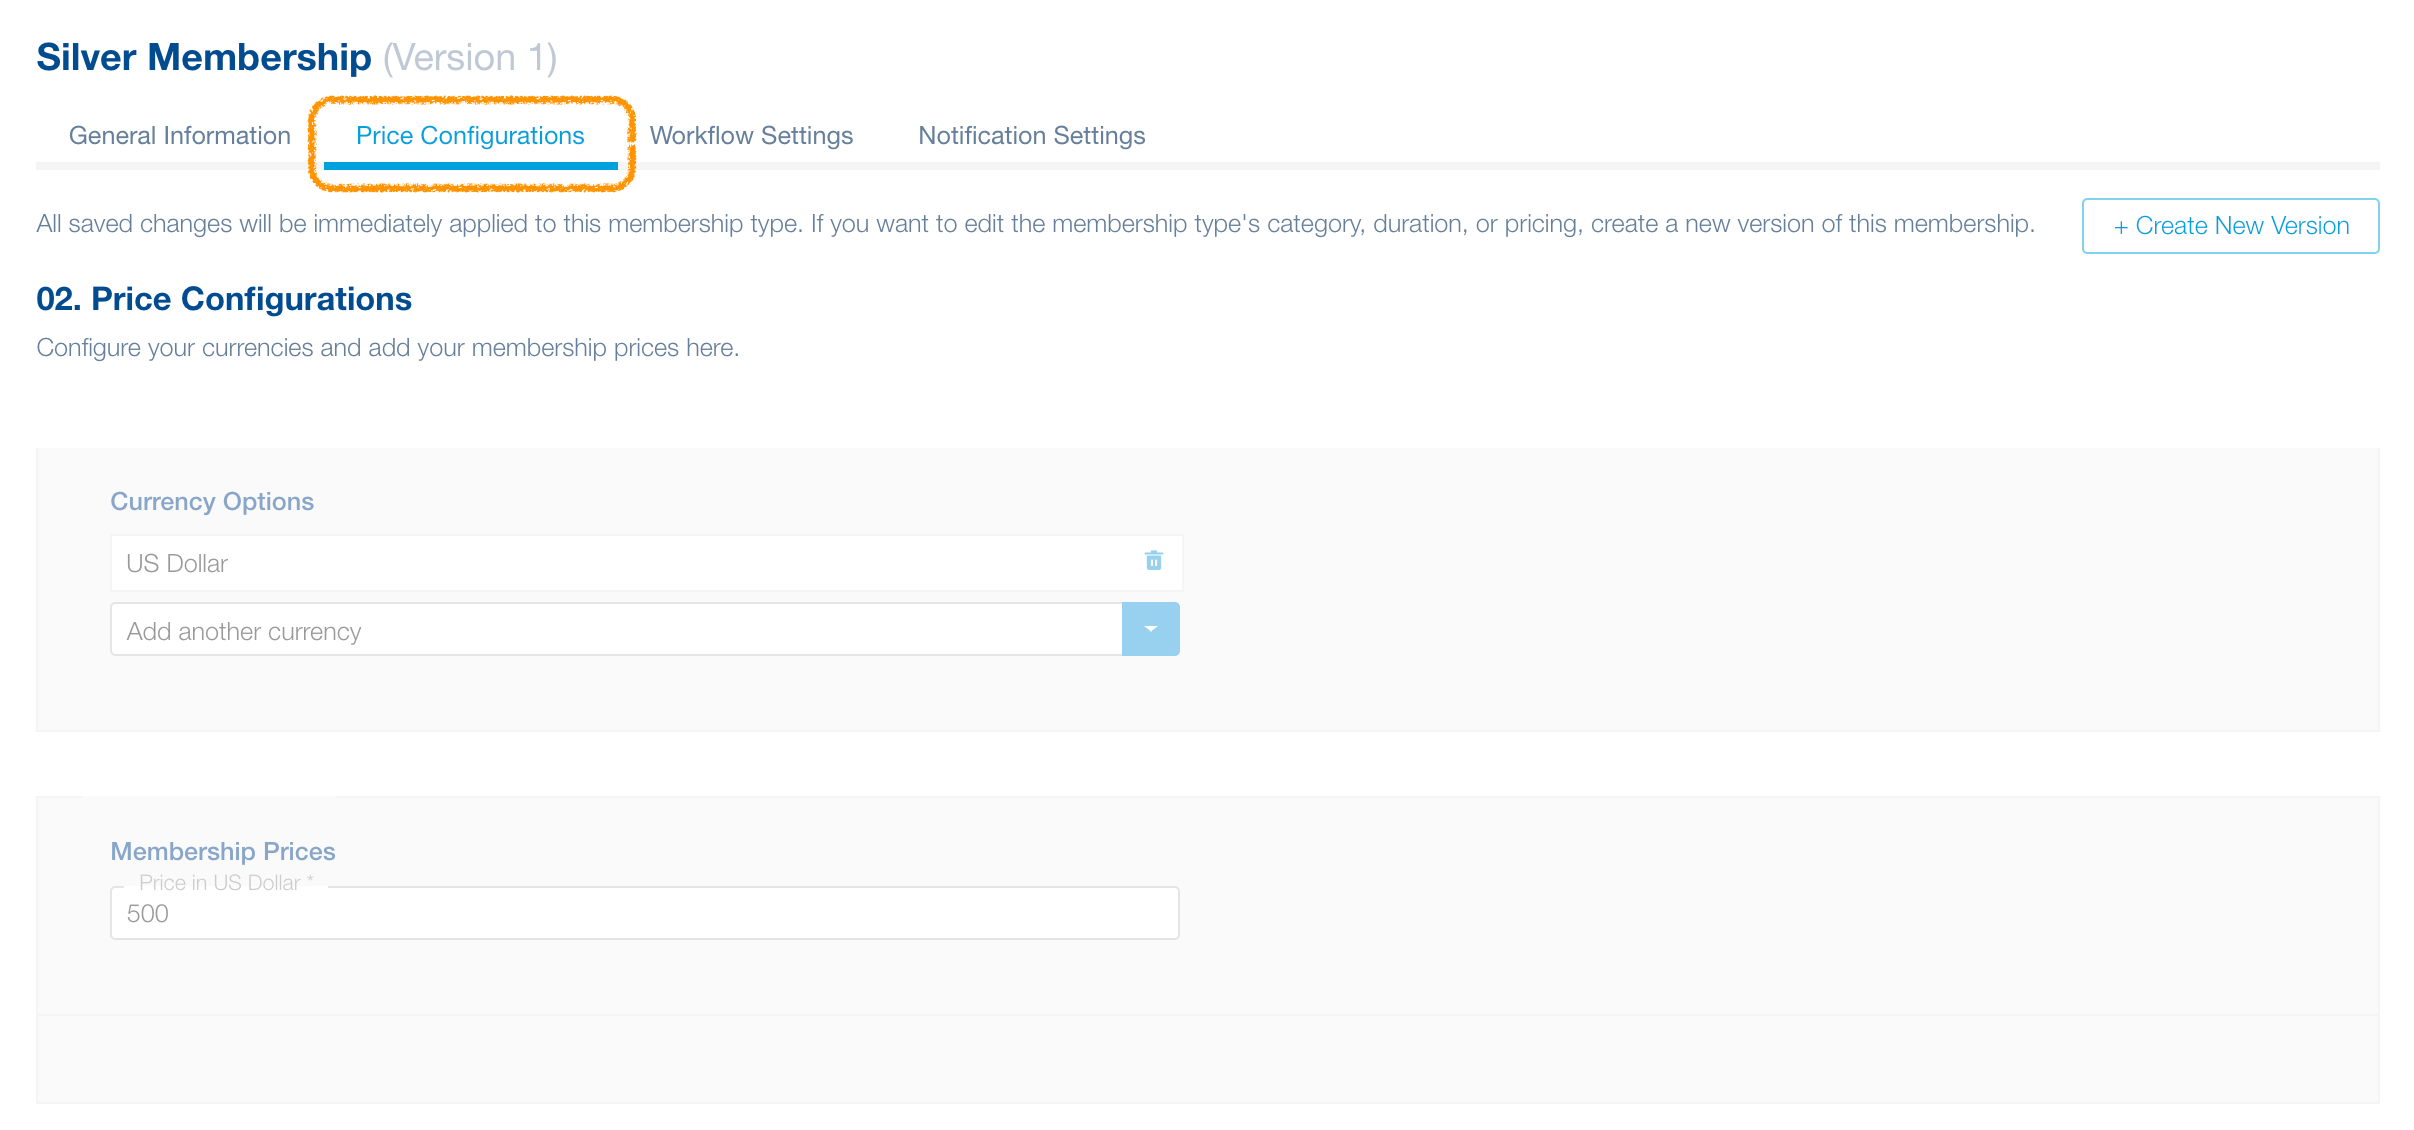
Step 2: Price Configurations
Select the currencies that your organization uses to process membership-related transactions. Enter the price for this new membership type as well as any prices for adding additional members. You can configure additional member pricing for purchases made during the application process and additional member pricing for purchases made at a later time. You can also add any additional fees, discounts, or taxes as needed.
Important: If you select more than one currency, you must enter price configurations for each.
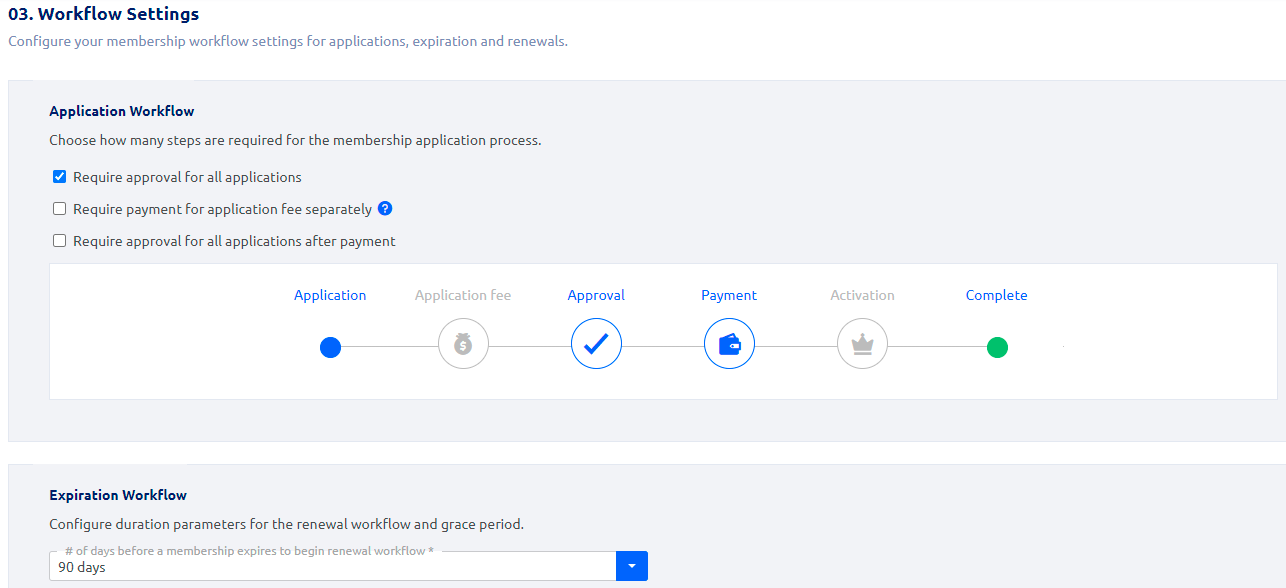
Step 3: Workflow Settings
Customize how each member experiences the application, expiration, and renewal processes for the membership type.
First, choose whether all applications require organization approval or activate immediately upon payment. Also, you can choose if you would like to require payment for the application fee separately.
For expiration settings, choose whether you want a set a specific number of days prior to the expiration date that the membership can be renewed. For example, if you select ’30 days’, a member will be able to renew his or her membership no earlier than 60 days prior to the membership expiration date. During this timeframe, active memberships will be managed in the renewals section of the Membership module. If no option is selected, a default period of 30 days will be enabled.
You can also choose whether to provide a grace period to any member who does not renew his or her membership before the membership expiration date. A grace period provides extra time for a member to renew his or her membership without going through a new membership application process. Memberships will be considered active through the last day of the grace period.
Next, choose whether renewals for this membership type require organization approval.
If this membership type is a corporate membership, choose if new members require organization approval when joining a membership. This option only applies if a primary member adds a new member to a corporate membership.
Tip: View graphic representations of your workflow settings by clicking on any of the blue links, e.g. ‘View current application timeline’. If you change any settings, you can view updated graphics by first clicking the button ‘Refresh Timelines’ then any of the blue links. Be sure to save your settings before leaving the Workflow Settings page.
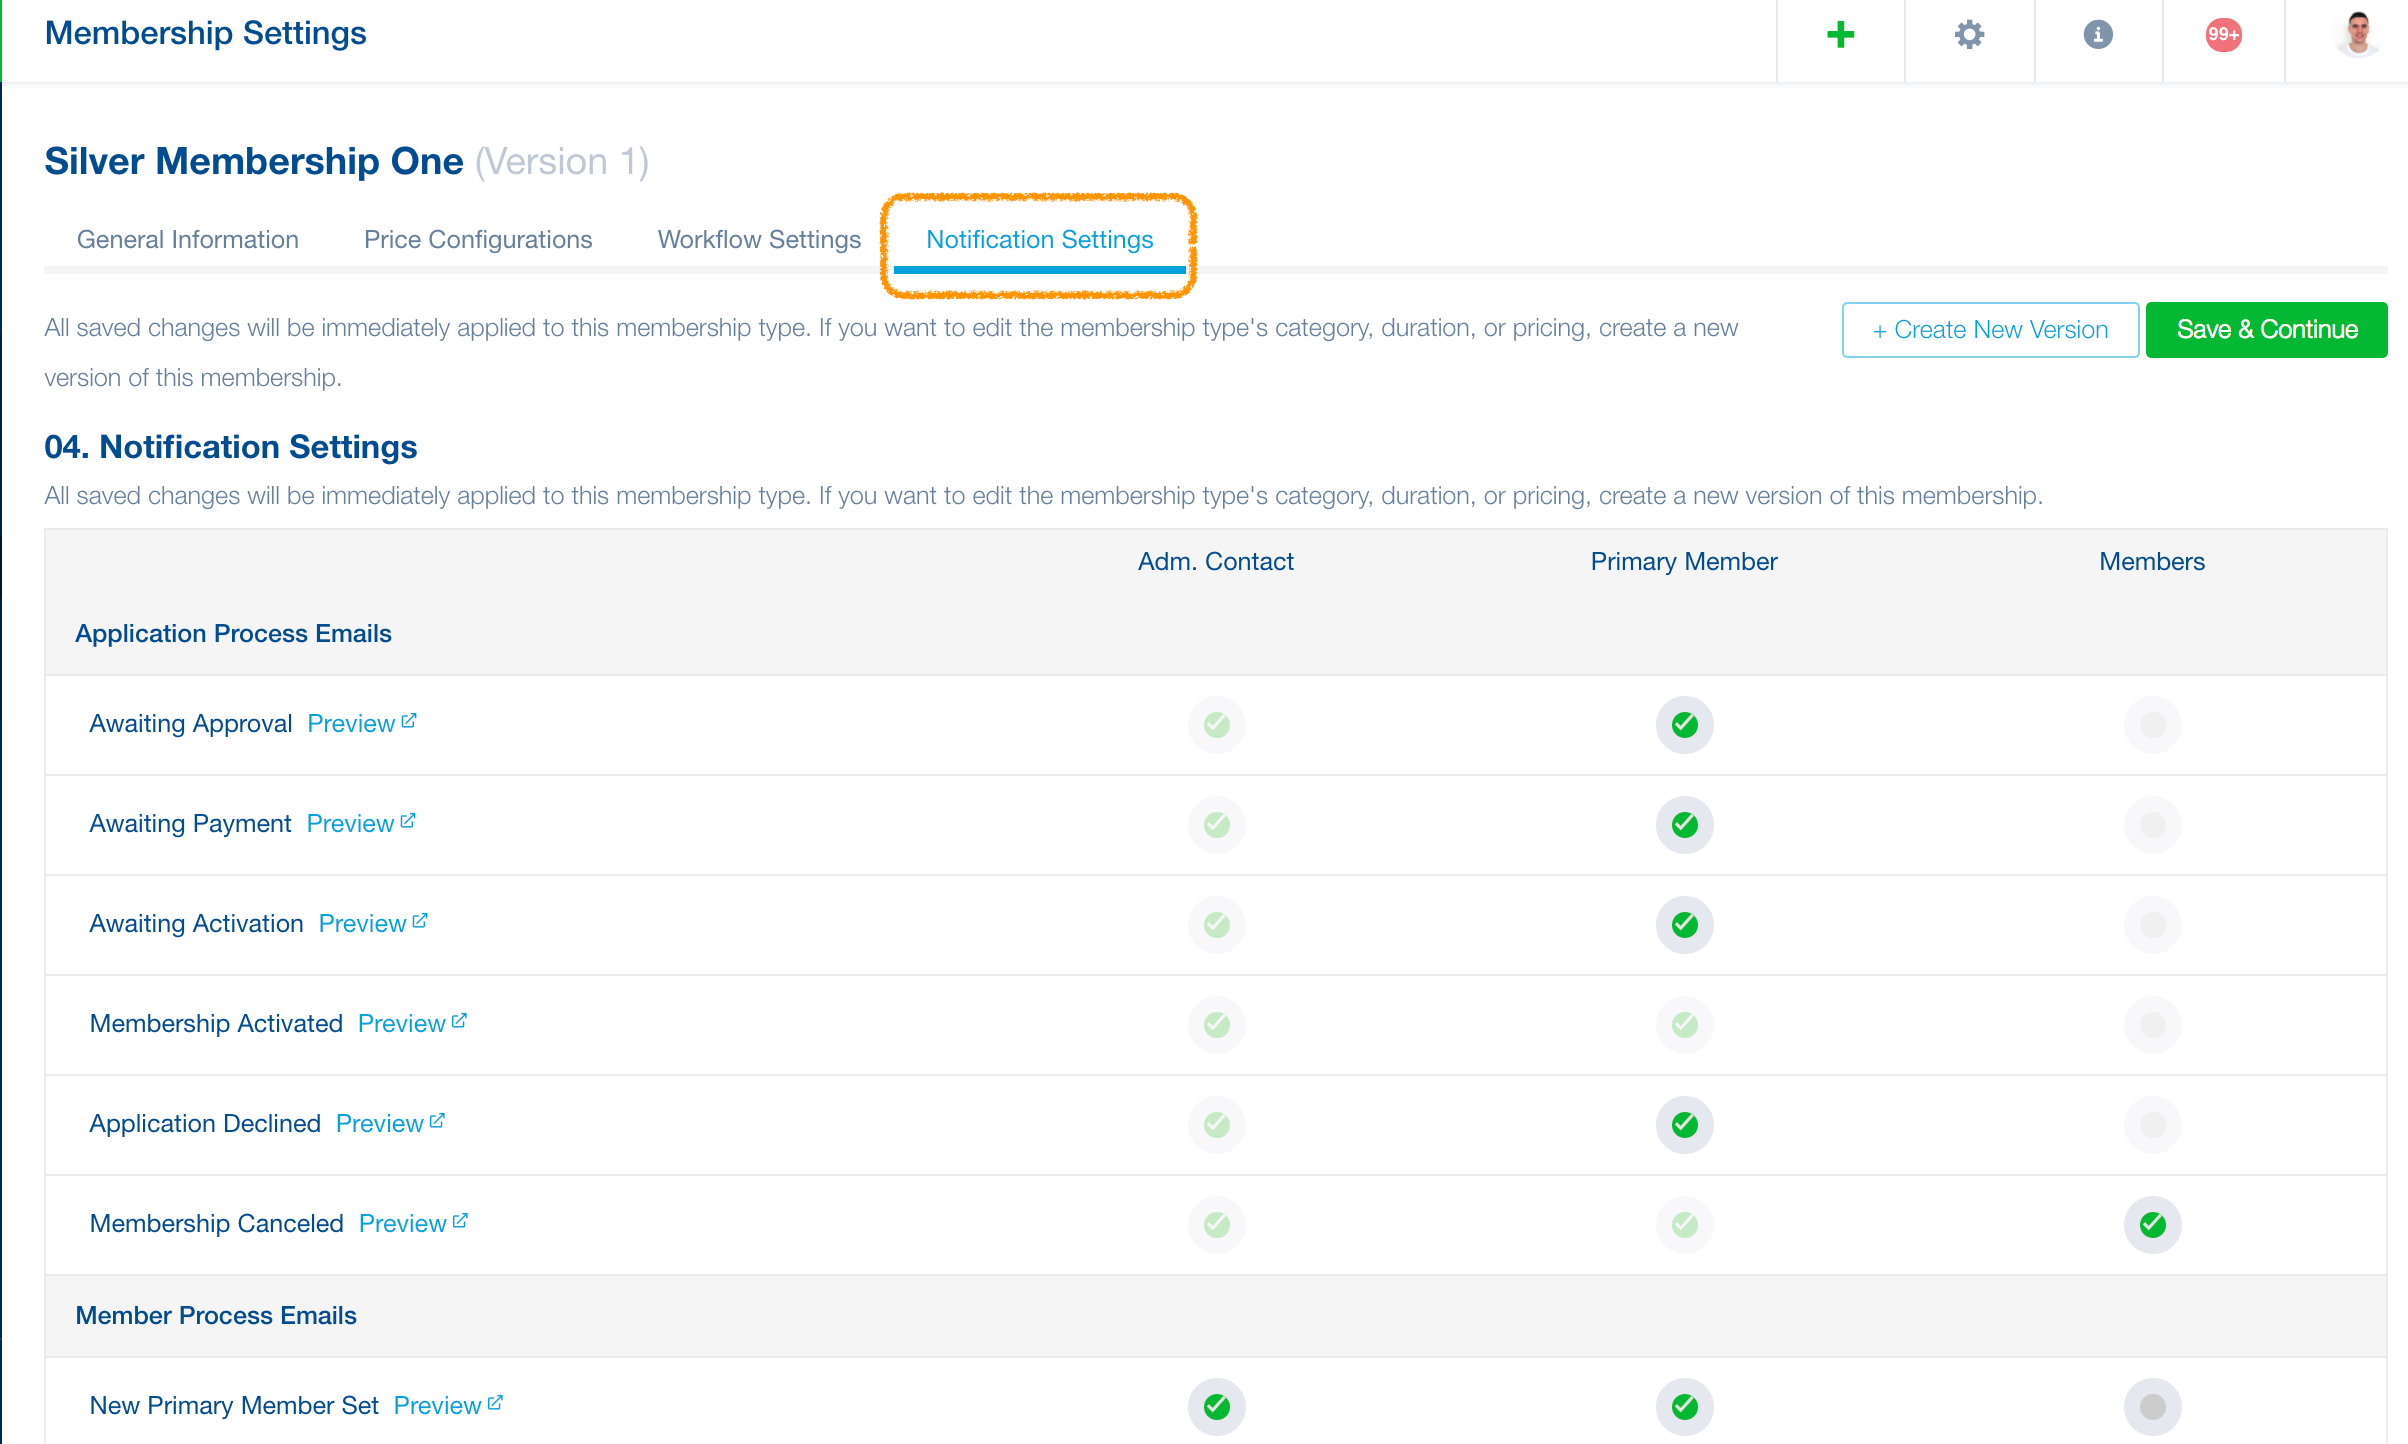
Step 4: Notification Settings
Configure settings for all system-generated emails related to the membership type. Customize notifications for application processes, renewal processes, new member and extra member requests, and expiration notifications. Settings for corporate memberships can be adjusted according to the administrative contact, primary member, and member roles.
Notification emails will feature your logo and branding set in the Profile section of Account Settings, Branding subsection. Email content cannot be customized. You can preview the email notifications on the link ‘Preview’ next to the email title (note: certain elements such as currency or contact email will not reflect the actual one that will appear on the automated system emails that will be sent to your members). To learn more about enabling or disabling system email notifications, click here.
Tip: You can send additional system-generated notifications for the expiration workflow by clicking the blue link ‘Add Notification’.
Managing membership types
Fast actions for membership types
In the main screen of the Membership Settings’ Membership Types section, you can click the three dots icon in the row of your desired membership type to perform fast actions:
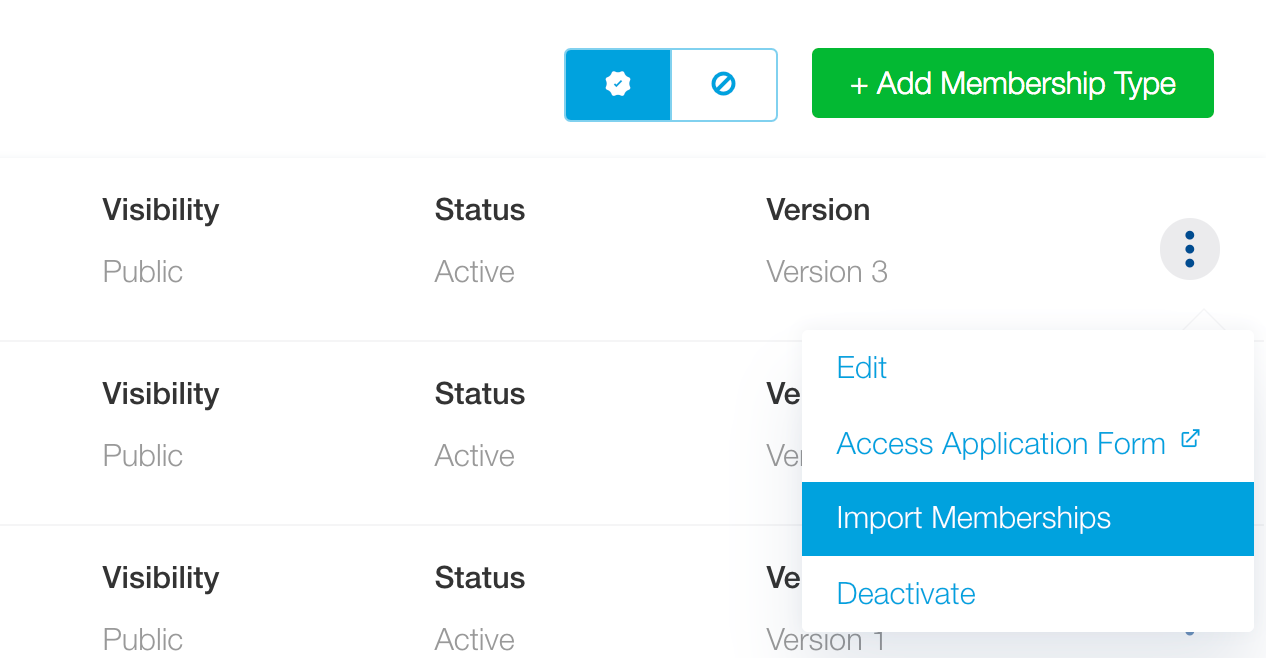
- Edit: This will take you to the membership type’s general information page.
- Access Application Form: This will take you to the application form that prospective members will see for the membership type.
- Import Membership: This will take you to the Membership Settings’ Import section.
- Duplicate: This will duplicate the membership type and will take you to the new membership type’s general information page.
- Deactivate: This will deactivate the membership type.
If you click in the middle of a row, a side panel will pop out with an overview of the company’s profile information. This panel also provides action items such as edit, access application form, import memberships, and duplicate. Additionally, you can click the three dots icon to see the action item deactivate to make the membership type inactive. The panel also provides information on how many memberships, applications, and renewals are associated with the membership type.
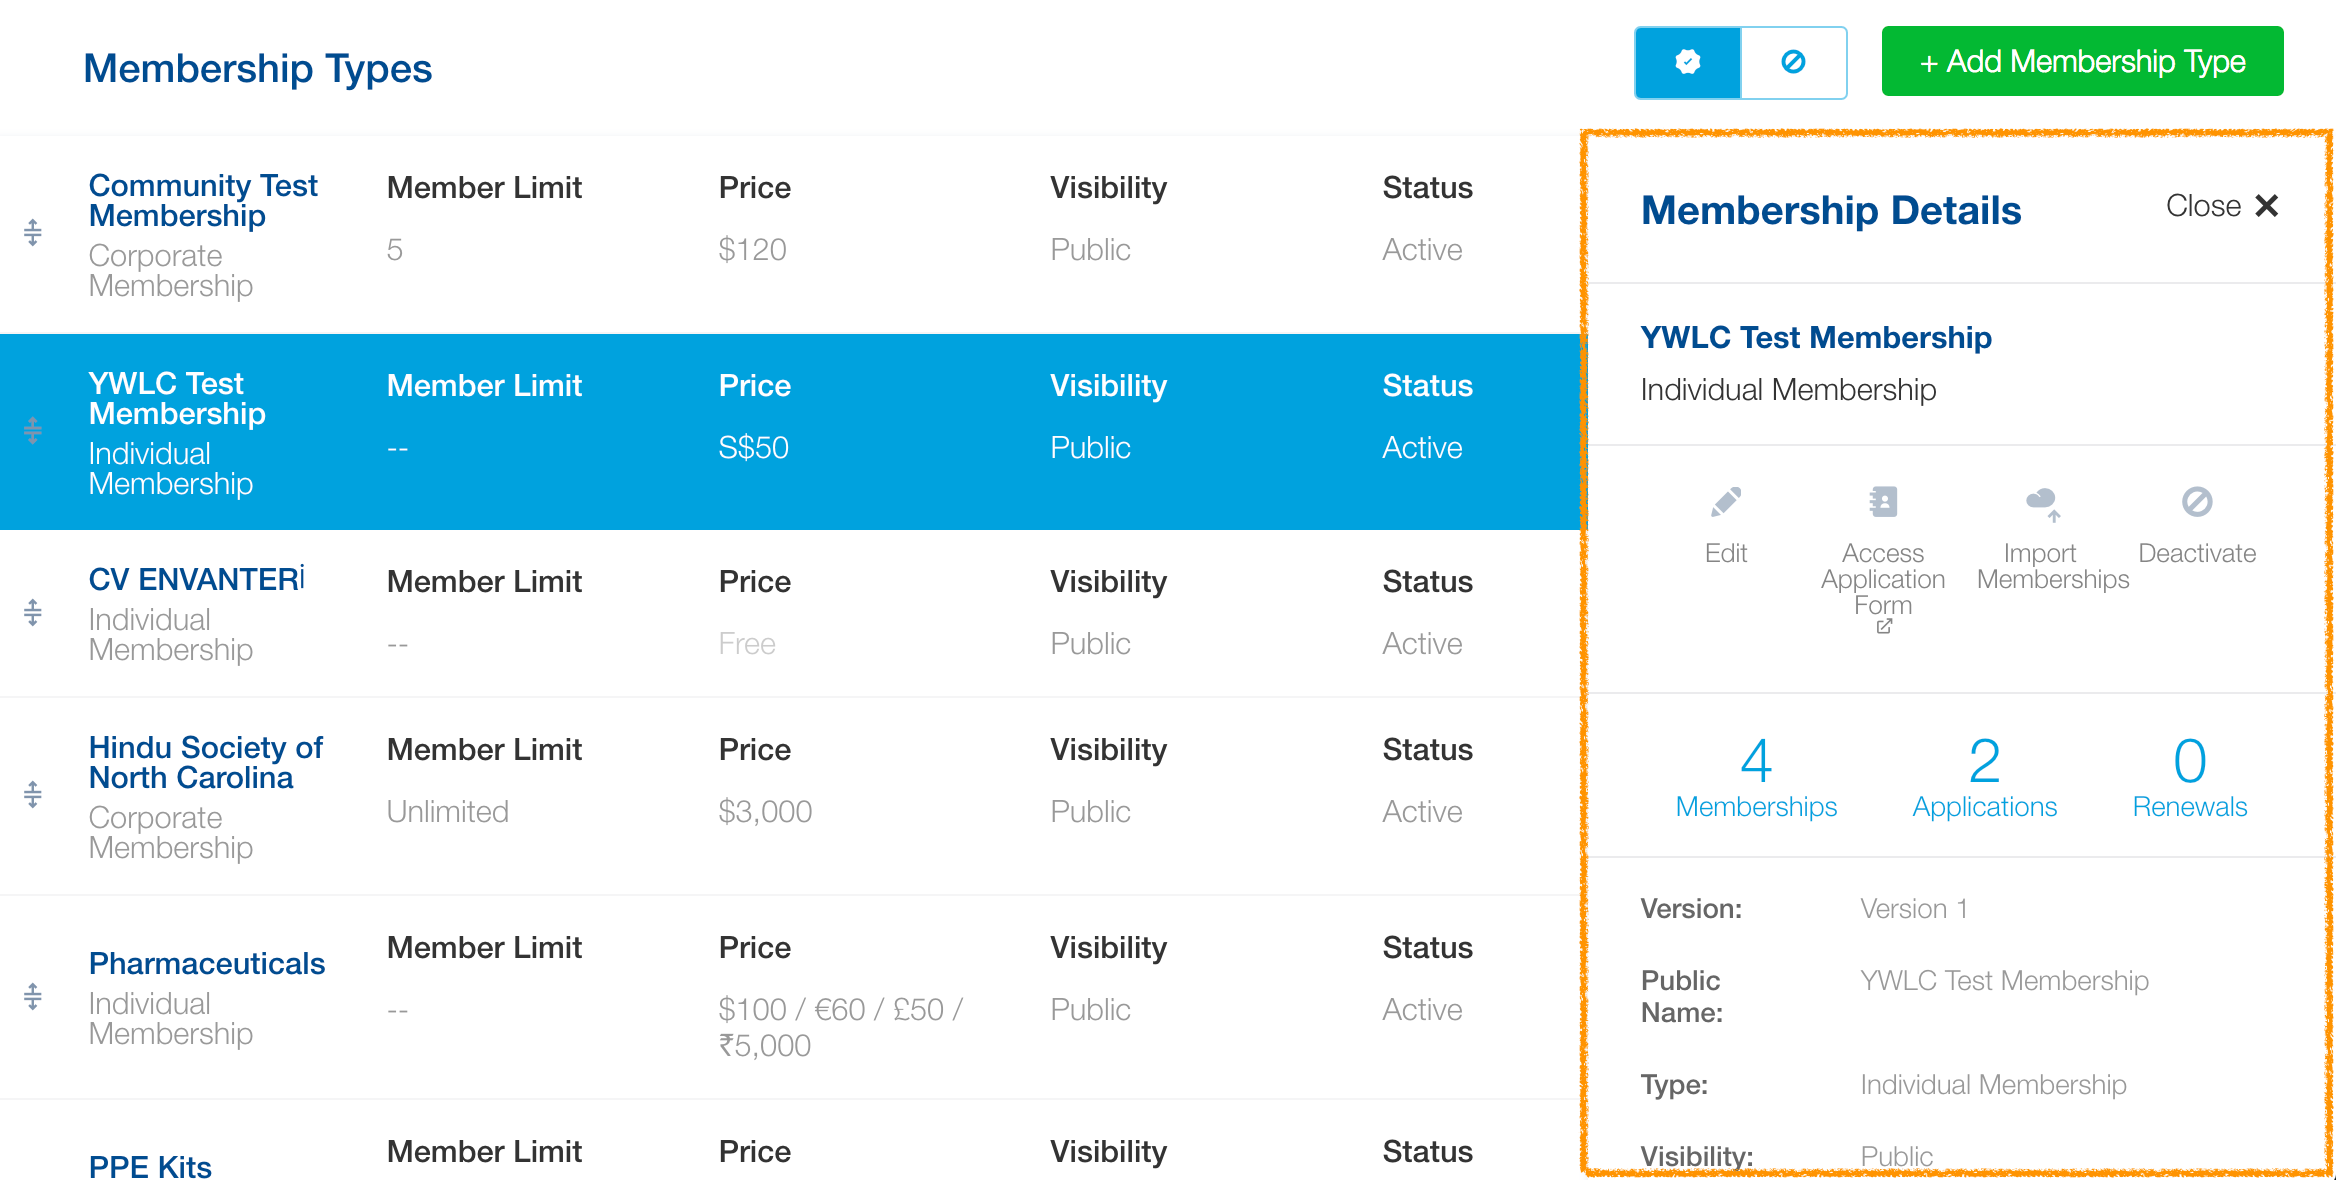
All membership types can be dragged and dropped to reorder as needed, thanks to the icon on the left.
Additionally, you can use the active/inactive switcher to move between active and inactive membership types. If the switcher is on the inactive tab, you can click the three dots icon on your desired membership type to see action items such as duplicate or activate. Side panels for preview are also displayed in this area.